Posted in cargo van, Commercial Van, Van Ladder Racks

Commercial Vehicle Safety Equipment

Commercial Vehicle Safety Equipment

Stay Safe with Ranger Design’s Commercial Vehicle Safety Equipment

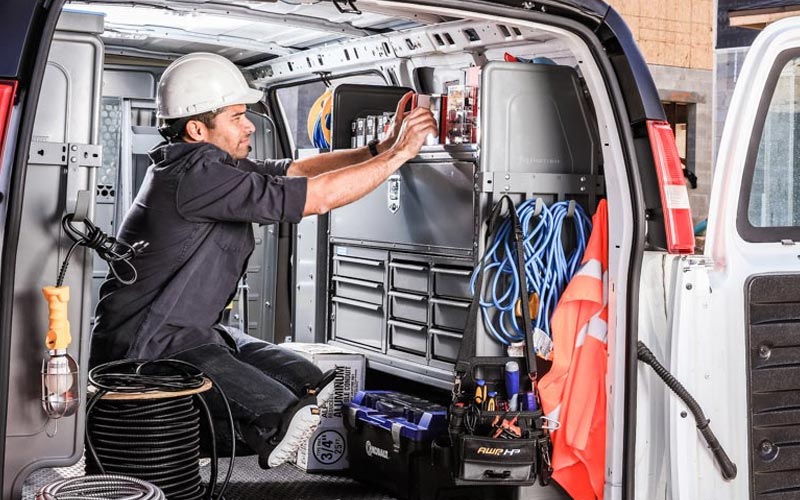
As a mobile technician, what is your greatest asset? Some may say your commercial vehicle or high-quality tools, and these certainly would be important. However, YOU are your greatest asset! And with this in mind, it’s important to think ahead to ensure you’re doing all you can to stay safe. Here are a few examples of safety equipment such as partitions, Flettner vents and alurack ladder rack, that increase well being while driving or on the job:

1. Install a Partition for a Safe Ride:

With so many tools and heavy-duty materials in a commercial vehicle it’s imperative to guard yourself with effective safety equipment in the event of a crash. In a collision even a light object can become a missile, projecting forward at a speed of 20 mph. Being struck with that kind of force could easily be fatal which is why every cargo van needs to be upfitted with a partition. Contoured, sliding door or clear view, there’s a partition built to suit your every need.

2. Keep the Air Fresh in your Cargo Van with a Flettner vent:

Driving and working in your commercial vehicle all day can quickly heat up the air space in your van. Breathing stale air over a long period of time can prove unhealthy, especially if it’s mixed with other fumes such as gasoline or diesel. The product most used to keep the air fresh is the Flettner vent. Made to push toxic air out and fresh air in, it’s a simple solution to keep drivers healthy and awake on the road.

3. Get a Max Step for Easy Access to your Cargo Van:

To be constantly stepping up into your commercial vehicle all day long, especially a high roof, can create unnecessary back strain and medical issues. Also, there’s always the chance of slipping and falling when stepping down out of the van. To make access to the van easier and less hazardous, Ranger Design created the Max Step. A durable rear step for all cargo vans, this piece of safety equipment is designed to eliminate accidents and offer tradesmen easier access to their cargo area.

4. Eliminate Back Strain with a Max Rack:

The job of a mobile technician is generally physically demanding, so whenever possible it’s good to get the right safety equipment to help prevent injuries. For contractors working with tall ladders, getting them down from the roof of their commercial vehicle can be a challenge. It was for this reason that Ranger Design created the Max Rack, a drop-down ladder rack designed to make loading and unloading of the ladder an easy job. With one simple movement the Max Rack brings the ladder down to the right height with minimal effort.

5. Light up your Work space:

Lastly, there’s no telling what accidents can happen inside a dark van. Fumbling around blindly through sharp, metal equipment for your tools is only asking for trouble. Cuts and bruises, if not worse, are inevitable. To reduce that risk it’s only smart for tradesmen to install lights in the cargo space of their commercial vehicle. Ranger Design offers inexpensive and quickly upfitted LED light strips for all vans, illuminating your work space and increasing overall safety.

Ranger Design Offers the Full Safety Solution for your Trade

The right safety equipment is key for all tradesman to have in their commercial vehicles. Take every precaution while driving or on the job, and treat yourself to a long and healthy life!

Posted in cargo van, Commercial Van

Safeguard Your Cargo Van Against Tool Theft

Safeguard Your Cargo Van Against Tool Theft

While Working On The Job, Protect Your Cargo Van From Tool Theft

With the high cost of equipment, a mobile technician’s worst nightmare is having his tools stolen from his cargo van. Tool theft is very common these days, and many tradesmen are affected by it. Luckily, there are helpful preventative actions that can be taken to ensure your cargo van and the equipment inside will be safe from crime!

Safe Environment for your Cargo Van

Keeping your cargo van in a safe environment is an easy way to prevent tool theft. Vehicle break-ins are less likely to occur if your van’s parked in a garage or behind a fenced-in area. Criminals want to steal things with the least amount of effort possible. Discourage them from trying anything by adding that little bit of extra protection. During the day while on the job, park your van somewhere you can keep an eye on it or where there are people. Chances of having your cargo van robbed in broad daylight and in front of eye-witnesses, are slim.

Cargo van Alarms

The next most obvious option is a car alarm. Every cargo van should be equipped with a standard burglar alarm however you may want an upgrade depending on the tools you carry. With the standard alarm, it goes off when the van windows break or the door is forced open. The more state-of-the-art alarms offer a broader range of anti-theft features. Some can even be connected to your phone and will alert you to a break-in no matter where you are.

Window Grills and Tinting can Prevent Tool Theft

Equipping your cargo van with window grills and a dark window tint is another great and inexpensive burglar preventative. If a thief isn’t positive that there are tools inside your van, they’re much less likely to risk breaking in. However, for the few who decide take the chance, it’s a good idea to have window grills installed as well. Even if they break the tinted glass, they’ll find themselves confronted with steel bars and still no access to the cargo space.

Locks and Partitions

Not only are safety partitions imperative in a crash, but they’re also great theft deterrents. A crook entering the cab of your cargo van will find his way to your tools blocked by a partition. However, a partition will not fully protect your van if your cargo area can be unlocked from the cab. To create a full barrier around your tools, install a separate locking system for the cargo space. With access to the cab blocked by a partition and the cargo doors locked up, you can create a perfectly secure spot for your equipment.

Dash Cams

Although dashcams are mainly used in the event of an car accident, they can also be helpful when it comes to cargo van break-ins. Not all of them shut off when the vehicle is parked. Many are motion sensitive and start recording when they detect movement. Even the sight of a dashcam could be a quick way to avert theft. And if it isn’t, there’s still a possibility that they get caught on film, giving you more of an opportunity at recovering your tools.

Posted in cargo van, Van Ladder Racks

3 Key Steps to Setting up a Small Fleet

3 Key Steps to Setting up a Small Fleet

1. Preparation and Planning for your Small Fleet

The first step is most crucial to the success of your up and coming small fleet. You need to consider the impact of running your own company and how you will best manage it. Below are some tips to bear in mind when starting up:

  • The Market. Be sure to spend time carefully researching the market niche for your small fleet. Learn your customer base and size up your soon-to-be competitors. It is important that you know what you are up against and that you have a strategy to build your own loyal customer base. Decide how you are going to get your name out there. If possible, use your vehicles like moving billboards. Plan to have your fleet vans wrapped and get your company name and logo out there on the streets. Projecting a good image to potential customers is extremely important.
  • Expenses. Make a detailed plan of your expenses and your projected profits. Some expenses may include the purchase of a new vehicle or business location. There will also be payroll taxes, worker’s compensation and insurance, and of course your employee’s wages and benefit costs. How much you are able to spend on start-up costs will determine the size of your fleet but don’t make the mistake of multiplying your profits by the number of vehicles. Expenses may outweigh the profits in the beginning however that should change as you break further into the market.
  • Management. Plan how you will manage your small fleet in the most efficient way possible. Think about your invoicing and filing systems. How will they be best managed so it is an easy process for you and your customers? Scheduling is also important. GPS tracking devices can be extremely useful for this. By knowing exactly where your drivers are at all times, this will allow you to schedule their next appointments and give your customers an estimated arrival time.

There is a lot of planning needed when starting up a small fleet of your own and it is a good idea to get a second opinion. Speak to a consultant or a friend who may have gone through the same thing. They will make sure nothing is overlooked and will have helpful tips to get you started. 

2. Choosing the Right Vehicle for your Small Fleet

The next step is to choose the right cargo van to best maximize your potential. Take a look at the characteristics you’ll need the most in your fleet. Some factors include:

  • Price. Decide what are you willing to spend on your van. Do you want to buy it for the least amount possible in the beginning, and maybe upgrade once you are making a steady profit? Or do you want to bite the bullet and get a more expensive van that will last you for many years?
  • Fuel savings. Are you concerned with getting the best mileage possible? If you foresee your vehicles traveling over large distances daily, then a van with high fuel savings probably makes the most sense. Not only will you be saving money but you will also be making less of an impact on the environment.
  • Size. The size of your vehicle depends on your job. For fleets in a busy city, a smaller van makes more sense as it can fit into tight spaces and underground parking lots. However, it depends on what you will be using your vehicle for. If you plan to create a work station in the back of vehicle, then a high roof van is a much better option. Your employees will have the space to stand up without bending. The van size also depends on what you plan to carry. If you will be hauling skids, you need to make sure they will fit in your van and that they will not be heavier than the vehicle’s load capacity allows.

These are just a few suggestions to look into when choosing your fleet vans. Do some research on the cargo vehicles available and narrow them down to the one you think will meet your small fleet needs.

3.  Van Equipment for Your Small Fleet Van

Lastly, choose an upfit for your small fleet vans. Having the right van equipment for your work is an important factor in keeping the tools in your vehicles organized and in keeping your employees safe. Here are some products that you might consider putting in your vehicle for a better work experience:

  • Shelving. Outfitting your vehicle with shelving is a smart choice. Instead of having all your tools rolling free in the back of the van, they can be placed neatly on the shelves. This will help keep everything tidy and decrease the amount of time your employees spend searching for their parts and equipment. Bins and dividers can also be purchased with the shelves to offer an individual spot for the smaller tools.
  • Partitions. If you plan to put tools and equipment in the back of your vehicle, then a partition is mandatory. Although most cargo vans are sold with an OEM version, you may want to upgrade to one that will better suit your needs. For example, if your employees will constantly be entering the back of the van, you will want a partition with a door. Partitions are there to keep your driver’s safe, so why not get the most use out of them as possible?
  • Ladder Racks. If carrying any sort of ladder in your fleet van, a custom ladder rack is absolutely necessary. There are many different types available out there to suit your needs. First, decide which type of ladders and how many each vehicle will need to carry. Then research the rack that will be the most beneficial. If your employees will be accessing their ladders many times during a day, maybe a drop-down rack is the best option to reduce strain. If you are transporting both ladders and additional materials, then a cargo rack would be ideal.
Posted in cargo van, Commercial Van

Health and Safety Tips for Commercial Van Drivers

Health and Safety Tips for Commercial Van Drivers

Health and safety. It is a number one priority while at work. And for tradesmen and commercial van drivers especially, now is the time to be extra careful while on the job. Follow the health and safety guidelines to ensure your cargo van stays clean and sanitary.

Keep the Air Fresh

Ensure that the air in your cab and cargo space is constantly moving, and not staying stagnant in your vehicle for long periods of time. One product that helps with this, is a Flettner vent. Installed on the roof of the commercial van, it sucks in fresh air as you drive while forcing the stale air out. This lowers the chance of germs settling on surfaces, reducing the risk of sickness.

Put Up a Barrier for Yourself

For commercial vans designed to carry passengers or materials that may be contagious, it is a good idea to put up a barrier to protect you. Composite safety partitions for cargo vans are a great option. Their tight fit to the van walls prevent germs from seeping into the cab while you drive. For smaller passenger vans, a clear plexiglass shield offers just as much protection and also allows the driver and passengers to see and hear each other clearly.

Clean Your Work Space Regularly

Giving your commercial van a quick clean, as often as required by company guidelines or government regulations, is a good way to rid yourself of germs and bacteria. However sometimes it can be difficult to wash the things you touch the most; your seat for example. That’s why we suggest Seat Covers. Sturdy and fitted, they are also removable which means you can throw them in the washing machine as needed.

Keep Protective Equipment Close

Hand sanitizers, gloves, masks… these are essential items to be carrying around in this current time. However, these are relatively small items which means they can be easily lost in the equipment of a commercial van. The solution to this is the 3-in-1 Sanitizer Caddy. This aluminum holder mounts anywhere in your van and stores all the essential items you need when coming into contact with other people.

Posted in cargo van, Commercial Van

Van Partitions for Your Commercial Vehicle and Your Trade

Van Partitions for Your Commercial Vehicle and Your Trade

You cannot put a price on safety and that is an important point to remember when shopping for a van partition for your commercial van. The partitions are designed and tested to meet the toughest safety standards in North America. They are engineering for driver comfort and provide a quiet ride. Below we have outlined some of the benefits of each safety partition:

Straight Van Partitions

Designed for medium and high roof cargo vans, straight partitions are made from steel and offer no access from the cargo space to the cab. They are really made to offer you a solid barrier between you and your cargo. In the event of a crash, you will not be injured by any flying objects in the back of the van. The straight partition can also be used as a canvas for other accessories. By adding a few hooks or some paper holders, you can create an extra wall of storage in your commercial vehicle.

Walk-Through Van Partitions

Next up are walk-through partitions available in steel and aluminum. It makes sense to consider a walk-through partition when access to the cargo area is a priority, like it is for last mile delivery. There are several different styles – swing door, sliding door and direct walk-through. The swing door option is steel which is more economical for fleets, while the sliding door option is designed to be lightweight for reduced payload. Both these models are very popular for delivery vehicles and are made to latch as a theft preventative. Walk-through van partitions offer you a great combination of safety and accessibility.

Contoured Van Partitions – Large Vans

Contoured van partitions are a great choice if comfort is your number one priority. They are set back from the van’s B-pillar to allow for full seat travel and recline and are made from aluminum or composite material. The aluminum models are designed with either a perforated or tempered glass window for those of you who prefer to have a view into the back of your van. Our composite option is made from durable TPO with a tight fit that helps keep heating and cooling in the cab, and odors out. It also comes with a sturdy grab handle for extra accessibility when climbing in and out of your commercial vehicle.

Contoured Van Partition – Small Vans

Contoured partitions are really designed to give as much room in the cab and the cargo area, as possible. This is very useful in a small van, where space is already tight. If you are looking for something with a roomy feel, the Max View van partition is an excellent option. Not only does it give the driver more room, but it also makes the cab feel a lot more open with its clear polycarbonate top. 

Another contoured option – probably the most economical choice – is the wire mesh van partition. It protects the driver while allowing air circulation in the van. The last option is our solid contoured van partitions made from steel or aluminum. They offer a solid barrier between the cab and cargo area, creating a more enclosed cabin for increased heating and air conditioning regulation. These contoured partitions are tough and durable and make a great choice for any small commercial vehicle.

You cannot put a price on safety and that is an important point to remember when shopping for a van partition for your commercial vehicle. Our partitions are designed and tested to meet the toughest safety standards in North America. They are engineering for driver comfort and provide a quiet ride. Below we have outlined some of the benefits of each safety partition:

Straight Van Partitions

Designed for medium and high roof cargo vans, straight partitions are made from steel and offer no access from the cargo space to the cab. They are really made to offer you a solid barrier between you and your cargo. In the event of a crash, you will not be injured by any flying objects in the back of the van. The straight partition can also be used as a canvas for other accessories. By adding a few hooks or some paper holders, you can create an extra wall of storage in your commercial vehicle.

Walk-Through Van Partitions

Next up are walk-through partitions available in steel and aluminum. It makes sense to consider a walk-through partition when access to the cargo area is a priority, like it is for last mile delivery. There are several different styles – swing door, sliding door and direct walk-through. The swing door option is steel which is more economical for fleets, while the sliding door option is designed to be lightweight for reduced payload. Both these models are very popular for delivery vehicles and are made to latch as a theft preventative. Walk-through van partitions offer you a great combination of safety and accessibility.

Contoured Van Partitions – Large Vans

Contoured van partitions are a great choice if comfort is your number one priority. They are set back from the van’s B-pillar to allow for full seat travel and recline and are made from aluminum or composite material. The aluminum models are designed with either a perforated or tempered glass window for those of you who prefer to have a view into the back of your van. Our composite option is made from durable TPO with a tight fit that helps keep heating and cooling in the cab, and odors out. It also comes with a sturdy grab handle for extra accessibility when climbing in and out of your commercial vehicle.

Contoured Van Partition – Small Vans

Contoured partitions are really designed to give as much room in the cab and the cargo area, as possible. This is very useful in a small van, where space is already tight. If you are looking for something with a roomy feel, the Max View van partition is an excellent option. Not only does it give the driver more room, but it also makes the cab feel a lot more open with its clear polycarbonate top. 

Another contoured option – probably the most economical choice – is the wire mesh van partition. It protects the driver while allowing air circulation in the van. The last option is our solid contoured van partitions made from steel or aluminum. They offer a solid barrier between the cab and cargo area, creating a more enclosed cabin for increased heating and air conditioning regulation. These contoured partitions are tough and durable and make a great choice for any small commercial vehicle.

Posted in cargo van, Commercial Van, Van Ladder Racks

Why Buy a Van Ladder Rack for Your Commercial Vehicle?

Why Buy a Van Ladder Rack for Your Commercial Vehicle?

Heavy Duty Aluminum Van Ladder Racks

  1. Easy one person operation
  2. Heavy duty rack construction & large carrying capacity (up to 600 lbs)
  3. Rust free aluminum construction & ergonomic design (powder coated white finish)
  4. Available in many styles for many types of vans
    (single, double, combination or drop down)

Van Ladder Racks are Essential for Successful Tradesmen

Van ladder racks help tradesmen overcome some big challenges to their day to day operations. A well designed rack can offer many advantages to the tradesman beyond just loading and transporting a ladder.

The stores have a number of different styles of racks that can help tradesmen free up valuable interior cargo space while helping them work more effectively and safely. All of our van ladder racks are made of heavy-duty aluminum and are contractor proven tough. They work hard and pay for themselves by helping tradesmen save time and money.

All van ladder racks mount to the roof of a van and allow the ladder(s) to be safely stored and transported on the roof. This frees up valuable interior space giving you more cargo capacity for transporting more equipment and materials.

Nobody likes to lose time and money due to injury. A van ladder rack can reduce the risk of injury making it much safer to load and unload a heavy awkward ladder. Once stowed up and out of the way, it is safely secured for transport around town and out on the highway.

Wasting time wrestling with a heavy ladder costs you money. Our van ladder racks are designed for simple one person operation. By making it much easier and quicker to load and unload a ladder, you save time. Repeat this process many times and day and it’s easy to see how our van ladder racks help you work more effectively.

Ladders and commercial vehicles are expensive. Having to replace a damaged ladder or repairing vehicle bodywork adds to the costs of operating your business. You can protect both a ladder from damage and your vehicle’s exterior finish from dents and scratches with a well designed rack.

Posted in Commercial Van, Refrigerated Van

Benefits of Reefer Trucks for Perishable Goods Delivery

https://www.nbc12.com/resizer/lQincNkP1WEWW3O8kXtdL0BgH4E=/0x33:1775x921/1775x887/cloudfront-us-east-1.images.arcpublishing.com/raycom/7GSS6HFRIBB3LAY6G6PIWTZSMQ.png
Benefits of Reefer Trucks for Perishable Goods Delivery

Refrigerated vans offer many benefits for perishable goods delivery that are not available using traditional shipping methods. Below are a few reasons to use a cold or frozen truck for your perishable products:

  • Cost-Efficient: Reefer trucks allow you to ship more products at once while cutting back on packaging costs.
  • Great for Shorter Transports: You can complete local deliveries more quickly with a reefer truck than via mail, and your customers will be pleased with your fast delivery services.
  • Perfect for Large Shipments: Reefer trucks have the capacity for large shipments that would be costly to send via mail. If you have high-volume clients, they will appreciate receiving their deliveries quickly and at the same time rather than in several different packages.
  • Better Temperature Control: When using a reefer truck to deliver perishable goods, you can continuously monitor the temperature to ensure high-quality. When shipping products in the mail, you cannot control the temperature of the product once it leaves your business.

Perishable Goods Delivery Regulations

Depending on what type of perishable goods your company is transporting, there may be specific regulations that your logistics team must stay in compliance with to avoid liability. If you are carrying floral arrangements or other perishable products not meant for consumption, your primary concern will be maintaining quality rather than ensuring safety. If you are delivering food or pharmaceutical products, however, you must be aware of the applicable federal regulations.

The Food and Drug Administration (FDA) released the Food Safety Modernization Act (FSMA) in 2011 in an attempt to prevent food contamination that has become a growing problem in the U.S. As part of this regulation, the FDA specifies safe practices for transporting human and animal food. The rule on Sanitary Transportation of Human and Animal Food sets guidelines for maintenance and design of transportation vehicles, transportation operations, training procedures and record-keeping.

All vehicles transporting human or animal food must be made of materials that are able to be adequately cleaned and sanitized, such as stainless steel. Refrigerated shipping vehicles must be able to maintain the appropriate temperatures for food transport and have functioning temperature controls. During transportation, reefer truck temperatures must be maintained and monitored. Companies must keep accurate records of food temperatures at each stage of shipping, including loading, transport and unloading. Then, they must fully disclose these records when requested and retain them for up to 12 months.

Below are some other best practices to keep in mind when shipping food or beverages in reefer trucks:

  • Always pre-cool the truck before loading the product.
  • Always pre-cool the product before loading it into the vehicle. Reefer trucks are designed to maintain temperatures, not to lower the product’s temperature. This is particularly important with produce that has a high rate of respiration.
  • Verify that the reefer truck is at the correct set point required for the product you’re shipping.
  • Set the temperature mode to continuous, so the reefer truck actively maintains the set temperature. A continuous setting will have a set defrost cycle, so ice and frost do not build up on the truck’s cooling mechanisms. If the truck will be making a lot of stops and the door will frequently be open, you may need to adjust the defrost cycle, so the vehicle defrosts more regularly.

When delivering pharmaceutical products, you must comply with the FDA’s Code of Federal Regulations. Pharmaceutical products must not be handled or stored in a way that could adversely affect their quality, including proper temperature and humidity control during processing and transport. FDA regulations also require accurate record-keeping throughout the transportation and distribution process.

Posted in Refrigerated Van

Guide to Trucking Perishable Goods

https://upload.wikimedia.org/wikipedia/commons/3/30/G-3_Resources_LLC_Truck.jpg
Guide to Trucking Perishable Goods

Whether you are shipping produce, floral arrangements or pharmaceuticals, maintaining a cold chain from production to delivery is essential. If the temperature is not adequately controlled at all stages of production, your perishable goods could spoil or even make your customers sick. But for a small company, delivering perishable goods safely can be an intimidating task. You want to make sure your products arrive fresh and safe for consumption, but you may not know much about logistics management or shipping regulations.

Depending on the size of your business and the goods you need to deliver, you may opt to ship your perishable goods by a refrigerated truck for ground deliveries. Use this guide to perishable goods shipping to find the best delivery method for your business.

How Do I Ship Perishable Food and Goods?

For companies sending smaller deliveries directly to customers, shipping perishable goods in the mail may be the best option. Shipping cold or frozen products in the mail requires proper planning and care to make sure everything arrives safely to your customers. Follow these step-by-step instructions on how to ship perishable goods.

1. Know Your Products

Before you begin shipping goods, make sure you know the temperature at which you must keep each product, so it stays fresh. You should know the shelf life of each product to determine how quickly it will need to be shipped. These factors will help you decide which type of packaging is best for your products.

2. Choose a Container

A variety of shipping containers are available for shipping perishable goods. These special packages provide insulation to keep out heat. You can purchase styrofoam boxes with thicker or thinner walls to keep out more or less heat, and they’re generally the most effective at maintaining temperatures. Typically, Styrofoam boxes are shipped inside of cardboard boxes for better durability during transport.

You can also purchase Styrofoam sheets, insulated liners or insulated pads to place inside of a cardboard box. Sheets and pads are often more cost-efficient than Styrofoam boxes, as you can purchase them in bulk and cut them to the right size for each package. You can also wrap insulated liners around your product for extra protection.

3. Select a Cooling Agent

Once your product is packaged, you will need to add a cooling agent to keep your product cold during shipping. Ice packs are typically a good option for refrigerated goods, while dry ice is best for frozen products. Dry ice is considered a hazardous material, so you’ll need to clearly label any your packages containing dry ice and should check for additional requirements from your shipping provider.

When determining how much dry ice or how many ice packs to use, consider the size of the product, what temperature you need to maintain, how long it will be in transit and the climate of the area it’s shipping to. Shipping trucks can reach very high heats in the summer, so be sure to take this into account when adding your cooling agent.

4. Get It There Fast

Choose a shipping partner that can provide guaranteed shipping times, so you know your product will be delivered on time. You should also balance speed with cost, as overnight or one-day shipping can be very expensive. If you want to provide a reasonable shipping fee for your customers, choose the longest shipping time that will still keep your product fresh and safe.

Challenges of Shipping Perishable Goods in the Mail

The cost to ship frozen food can be expensive, as you will need to send it quickly and ensure that proper temperatures are maintained. Ice packs and dry ice also take up extra space, meaning you may need to use larger shipping containers, which can add additional cost.

Aim to use the smallest possible container for your product and choose the longest shipping time that will still keep your product safe. No matter what shipping method you select, make sure to have your shipping policies readily available on your company’s website so customers can understand the associated costs.

Posted in cargo van, Van Ladder Racks

How to add a roof rack to your adventure vehicle

#Vanlife: How to add a roof rack to your adventure vehicle
How to add a roof rack to your adventure vehicle

Whether you’re driving a Mini Cooper or a full size cargo van, one of the easiest ways to increase your adventure capabilities is to add a roof rack. While a roof rack isn’t always needed, if you want to carry large, bulky items like kayaks or roof top tents, or even smaller items like bicycles on smaller vehicles, roof racks are often the way to go. But to get there, you’ll have to start with the basics, like:

How can I put a roof rack on my vehicle?

There are a number of ways you can add a roof rack to your ride, but the ‘how’ will depend on your vehicle. There are essentially five categories when it comes to roof top accessories:

  • a completely naked roof
  • a naked roof but with factory mounting anchors
  • roofs with tracks
  • roofs with a factory rail system
  • roofs with factory rails and crossbars.

If your vehicle has a factory rail and crossbar set up, this can often be the easiest to accessorize – though they often have limitations in terms of weight capacity and compatible accessories. Because of this, you may opt instead to remove the factory cross bars and add a pair of Yakima, Thule, or other crossbars in order to increase the weight capacity and compatibility. In this case, it’s best to consult the vehicle manufacturer to find out the factory rack’s weight limits before deciding how to approach it.

The factory cross bars are usually best for the addition of roof top boxes or single bike mounts which will give you extra storage space for gear without adding a lot of weight.

It’s a similar story if your vehicle has raised side rails from the factory. You’ll want to head to Yakima or Thule’s website and use their fit finder to find the compatible tower and then choose your cross bar. Again, this set up may be limited to a certain weight which will only really become an issue if you want to install something like a rooftop tent and other accessories. Most brands will sell a specific tower that will fit your vehicle’s factory rails, and then the tower holds the aftermarket cross bar in place.

Without a factory rack of any sort, there are still a ton of options to install a roof rack. Both Yakima and Thule sell multiple tower systems that either use specific clips or fit kits for the naked roof of your vehicle, or they sometimes will mount directly to hidden factory mounts in the roof. Most of these systems are available for many different vehicles, all without permanent modifications to the roof. If you lease, plan to sell in the near future, or just don’t want to drill holes in your roof, this is the best course of action.

Posted in Commercial Van, Van Ladder Racks

3 Warning Signs that it’s Time to Replace Your Ladder Rack

https://www.adriansteel.com/blog/wp-content/uploads/2014/07/09gmcsglrack.jpg
3 Warning Signs that it’s Time to Replace Your Ladder Rack

Action wants to help you keep your equipment and employees safe. Check out these warning signs to see if it’s time to get a new ladder rack. Duct tape, wooden uprights, lots of bungee cords… all are major red flags. But of course, as a safe and responsible trades person, you’d never partake in any of the above. But guess what? Your ladder rack may still need to be replaced.

In fact, many of the service workers we asked said that they have a hard time balancing the value of their ladder rack’s SAFETY with its COST. We’re here to tell you that SAFETY trumps cost every time. EVERY. TIME.

So, does your ladder rack need to be replaced?

If you’re even reading this, it’s probably time to take a good, hard look at your ladder rack and ask yourself if it’s time to call it quits.

SIGN #1: DAMAGE

Rust

Specifically on steel ladders, corrosion and rust are a signal that your ladder rack’s integrity is compromised. This is a problem in the Southern United States where the air is damp and humid. Moisture-rich air can eat into a steel rack and leave rust in its wake. What it does to your ladder rack: Rust eats away at steel, weakening the structure and solidarity of your ladder rack.

Note: Action uses Galvanized Square Tubing for our Ladder Racks. This will prevent the Ladder Rack from dripping rust onto your cab.

Dents / Structural Damage

They go through a lot, our ladder racks. But there comes a time when those “love taps” become serious structural damage. Ask yourself: What’s happened to my ladder rack? How many dents does it have? Can they be pounded out? Is there any significant structural damage due to dents? How damaged does my ladder look? What it does to your ladder rack: Dents and structural damage lead to disaster, plain and simple.

Loose Parts (Clamps, Handle, Latch)

Loose parts are a definite sign of deterioration and wear. Ask yourself:

  • Is the handle designed as part of the ladder rack or is it a separate piece?
  • Do you feel like your ladder might fly off your rack at any time?
  • Do you hear lots of rattling?
  • Do you need to “pad” hooks or uprights?
  • Are you missing screws, bolts, or other parts?
  • Are you using bungee cords to keep your ladder secure?
  • Do you use duct tape on your ladder rack IN ANY WAY?

What it does to your ladder rack: Loose parts transform your ladder rack into a very dangerous piece of equipment.

SIGN #2 – POOR OR OUTDATED DESIGN

The design and style of your ladder rack for van is important to inspect, because it directly impacts your safety. If your rack is difficult to lower – or doesn’t lower at all – this can wear on your shoulders and back. A poor ladder rack design is one that was made to cut costs, in most cases. When cost is the main concern, safety and ease-of-use take a back seat.

How do you spot a poorly designed ladder rack? One way is to carefully inspect the materials it’s made with. Check the joints carefully; a solidly structured joint is a sure sign of quality. Look at bolts and screws – if anything is loose or poorly made, it’s a sign that the integrity of the rack is in question. Also check what type of protection is in place for your ladder. No padding? That’s going to wear on your ladder over time.

Do a little investigating – go online and check out manufacturer reviews on Google, Facebook, and other social media sites you visit. Another sign that your ladder rack is quality – your manufacturer is well-known in your industry. Never heard of them? Time to re-think who you’re buying your rack from.

Things to Check:

  • Material – Rack
  • Material – Clamps
  • Screws / Bolts
  • Joints

What it does to your ladder rack: A poor design can damage your ladder, your vehicle, and your overall health. Stop and ask yourself if it’s worth it.

SIGN #3 – CHANGING NEEDS

The last sign that you need a new ladder rack is that YOU’RE changing. Maybe your rack is great – or was great for your needs, at one time. But now you’re growing, or you’re changing vehicles, or maybe your business goals have changed. Whatever the reason, if your rack doesn’t fit your workflow, goals, and needs, it’s time to get a new ladder rack.