Posted in BEST CAMPERVAN AWNINGS

THE 5 BEST CAMPERVAN AWNINGS (2021 BUYERS GUIDE)

THE 5 BEST CAMPERVAN AWNINGS (2021 BUYERS GUIDE)

Downsizing your living space is one of the biggest pains of living in a campervan. But just because you have little to no interior space doesn’t mean you can’t utilize the great outdoors from time to time!

That’s why many van lifers choose to outfit their vehicles with camper van awning. Not only do camper van awnings protect from the sun, rain, or wind, but they also make living outdoors a bit more comfortable.

We’ll be honest with you – buying an awning for our van was one of the single best decisions we made! Instantly doubling our living space no matter the weather conditions is simply fantastic.

That’s why we tell every van lifer they should add an awning to their set up.

THULE HIDEAWAY

With the ability to be mounted three different ways (wall mount, roof mount, or rack mount), the Thule Hideaway is a universal van awning that’s a perfect fit for most campervan owners.

Not only is it super easy to install, but it’s also effortless to deploy when parked. With a simple turn of the hand crank, you’ll have sun protection and extra outdoor space in a matter of seconds.

The Hideaway is made from aluminum, meaning it’s just as lightweight as it is sleek. You’ll barely notice it on the roof of your campervan, which makes it a stealthy choice for travelers who don’t want to be weighed down with unnecessary bulk.

FIAMMA F45

The Fiamma F45 is a slim and compact van awning that works on both small campers and larger RVs.

It’s installed onto the side of your vehicle and provides adequate shade and wind protection for all your outdoor adventure (thanks to the reinforced arms and dual shock absorbers).

It’s a semi-permanent solution that doesn’t require any drilling since it comes with a set of 90 different brackets.

The shade can be easily rolled out – either manually or with the addition of electric control. It even comes wired with an LED light system, so you can still enjoy the great outdoors long after the sun goes down.

DOMETIC RALLY AIR PRO 330

Dometic is known for producing some of the best campervan equipment in the industry, so it should come as no surprise that they also have top-notch van awnings as well.

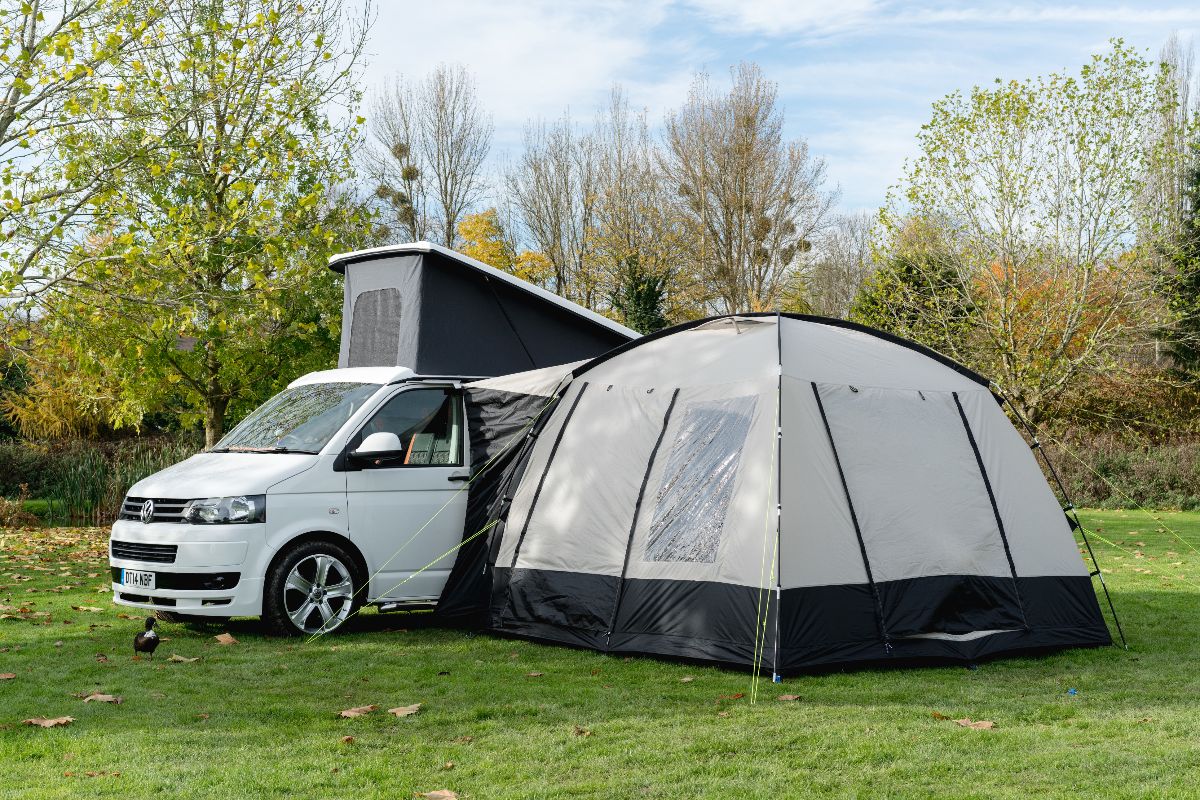
The Dometic Rally Air Pro 330 is an inflatable driveway tent that essentially doubles the space you have for your vehicle.

The zip-out panels are perfect for those who want a bit of fresh air, although the awning also has Apex ventilation for improved air circulation. However, the best thing about this product is that it can be used as a stand-alone tent. That means you can detach the awning from your van to reserve your camping spot if you need to make a quick run.

DOMETIC 8500

If you have a large campervan or RV, it might be difficult to the right awning that fits a vehicle of that size.

But thankfully, Dometic released the 8500, which is constructed specifically for camper vans between 11 and 15 feet.

Even though it’s suitable for larger vans, it’s still the lightest awning on the market today since it’s made with 100% aluminum parts.

Once you found your spot for the night, the awning can be deployed easily with just one person. By default, it comes with a manual hand crank, although you can also upgrade to an electric motor opening. This awning also features patented locks (for extra safety while driving) and seamless vinyl fabric that won’t affect your van’s aerodynamics.

MOONSHADE AWNING

As one of the most affordable campervan awnings available, the now legendary MoonShade Awning will only set you back a few hundred dollars.

At under $300, this revolutionary sunshade blocks out potentially harmful UV rays while also giving you extra outdoor space to eat, sit, or hang out.

Because it’s made from high-density twisted vinyl, this awning is super lightweight and durable. It’s also straightforward to install and set up, being one of the only shade cloths on the market that can attach to just about any RV or motorhome there is. Even just a normal car with their unique anchor systems!

Posted in Best Camper Van Awnings

Best Camper Van Awnings For Summer Adventures

Best Camper Van Awnings For Summer Adventures

Camper van awning has the potential to almost double the living space of your van conversion. I guarantee that extra space will be put to good use, too. Whether it’s fleshing out your cooking area, providing cover for an outdoor shower, or just a place to stretch your legs in the shade, camper awnings make off-grid living a little easier.

To help you with your comparison shopping, we’re going to take a look at eight of the best van awnings. We go over the pros and cons, and give our personal take on why each model might be right for you.

1. Thule Hideaway Awning

First on my list of the best camper van awnings is the Thule Hideaway Awning. This company also produces roof racks and shock-proof luggage, but they are squarely on top of the awning game.

Its sleek and stylish design will enhance the aesthetics of your vehicle and turn it into an off grid adventure beauty. Everything you need to set the awning up stores within the mount itself, which easily affixes to either the side or roof of your camper. The lack of loose poles frees up precious space for your other van life essentials.

2. BunduAwn

The BunduAwn wrap around awning from the mighty BunduTec is a cool bit of kit. It can provide shelter from the elements on not one, not two, but three sides of your vehicle: Front, back and one side of your choosing.

3. Debus Campervan Awning

Next on our list is a more affordable option for all the family – the Debus campervan awning. This shady character comes in at just £109.99–a tenth of the price of our previous recommendation.

And it performs admirably especially considering the price, offering ample shade and shelter. You can also really afford to spread out under the Debus, which measures 240cm along the van, reaches out 300cm, fanning out to a total 290cm. This makes for an awesome camping space! Now, did somebody pack the guitar?

The Debus awning comes in a fantastic range of colours, our favourite being bright orange. The awning is waterproof with fully taped seams and can withstand most weather conditions. It can also be set up as a free-standing structure away from your campervan if needed, making it perfect for taking down to the beach!

4. Skandia Camper Tramp

The Skandia Camper Tramp is a great way to essentially add an extra room onto your camper. It includes a large porch area, where you can set up a full dining space. There’s also a sleeping pod for two, complete with groundsheet and fly net.

So whether you’ve got a growing family, or just want to invite some guests to experience living the van life firsthand, this campervan awning greatly expands your living space without punishing your budget.

Posted in RV Slide Awnings

The Importance of RV Slide Awnings and How to Install

The Importance of RV Slide Awnings and How to Install

When you set up your RV at your latest camping destination, do you roll out your slide-outs and then forget all about them? You should be unrolling your slide awnings as well! If your rig isn’t equipped with RV slide awnings, you could be at higher risk for water damage.

Here we discuss the importance of camper slide awnings and explain how to measure and install your own.

Do You Need RV Slide Awnings?

You may have seen your neighbor’s rig with the mini awnings over their slides. These are RV slide awnings or RV slide toppers. When you ask: “do I need slide toppers?” Well, there’s a reason your neighbors have them!

There are 2 major benefits to equipping your camper with them:

  • Slide awnings keep debris, leaves, and branches, and bird messes from accumulating on your RV slides. If you allow debris to sit on your slides, it can cause discoloration but can also mess with the seals. If you retract your slides with branches or debris on top, you are bringing all that mess inside plus you’re inviting water in.
  • Toppers help prevent rain and snow from amassing on your slides. Water and RVs don’t mix well. So by diverting the water off your slide roof, you are less likely to end up with water penetrating your rig and leaving you with water damage.

In short, slide awnings are instrumental in helping keep your RV nice and dry. A properly installed cover can help protect your seals and prevent water damage that is common in RV slide corners.

Now that you understand why you definitely want RV slide out awning installation, let’s dive into the how of installing your own.

How to Install RV Slide Toppers

If you haven’t bought your RV yet, you may opt to have the dealer source and install your RV slide toppers. For those who already have an RV without toppers (or want to avoid the dealership prices), this is a project you can do yourself!

Install the awning rail

First, check to ensure your RV does not already have an awning rail installed. If it does not, position the new awning rail along the line where the roof and wall meet or a minimum of 3″ to 6″ maximum, above the upper edge of the slide room the awning will cover. The awning rail must be level and parallel with the floor line of the unit.

After determining the awning rail’s proper location, mark its position with a non-permanent method of marking. Then, apply butyl tape to the back of the awning rail and attach with the supplied screws.

Once the rail is installed, spread open the installation corner with needle-nose pliers to prevent the vinyl from catching the sharp edge when installed. Also, make sure there are no sharp edges.

Finally, trim up any excess butyl tape with a razor knife.

Install the access plate and bracket

Apply butyl tape to the back of the plate. Then, attach each plate to the exterior corner of the slide box with the supplied screws. Trim up any excess butyl tape with a razor knife. Finally, slide in the bracket according to the installation manual.

Assemble the extension rod and cap

Slide the extension rod into the spring head assembly torsion arm, aligning the fastener locations. Then, slide the spring head assembly torsion arm end cap into the extension rod, aligning all three fastener locations. Fasten using the provided 1/4″ – 20 x 5/8″ slotted pan head, self-tapping screw. Repeat for the opposite end.

You’ll now need an extra set of hands to help you install the awning into place. With a person on each end, unwrap the fabric one turn and slide the vinyl into the rail end with the corners spread open. Slide the torsion arms in each access bracket.

Secure into place

Once the awning is installed in the rail, you can now remove the pins on each side with needle-nose pliers. Retract your slide room in/out a couple of times to make sure it’s square with the RV and rolling up straight. Once everything looks good, secure the access bracket and vinyl with supplied screws. That’s all!

Posted in Repair RV Awnings

How to Repair RV Awnings: Battling Tears or Holes

How to Repair RV Awnings: Battling Tears or Holes

If you’ve ever gone camping under rough conditions or in windy weather, the odds are pretty good that eventually, you’ve found yourself wondering how to repair recreational vehicle (RV) awnings. The following guide will help you through the most common RV awning repairs involving holes or tears in your awning fabric.

Understanding How to Repair RV Awnings

If your repairs are more serious than a tear or small hole, never try to remove the spring-loaded end caps yourself, as serious injury can result. Make sure to check out How to Install an RV Awning Yourself to learn more about how to safely replace an RV awning.

Due to the nature of what RV awnings are made to do, they are usually the first part of your RV that will need some form of maintenance or repair. This is because awnings protect you from the elements, including wind, rain and anything else the sky may throw down at you. Unfortunately, that also means the awning is susceptible to tears, rips, and even frame damage.

How to Repair RV Awnings With Tears or Holes

The fact is, you are most likely to discover leaks or small tears in the awning when you first put it up after arriving at the campsite. This is because when people are in a hurry to break camp, checking for awning damage isn’t usually a high priority.

However, learning about damage to the awning when you first arrive at camp isn’t very fun — so the following guide will help you repair the most common awning damage with the fewest tools and supplies. If you’ve packed a tent repair kit (available at most camping stores), then you likely have everything you need to repair the awning.

Things to consider before your camping trip:

  • The most important piece of the tent repair kit is clear repair tape. If your kit doesn’t have any, make sure to visit your nearest RV dealer and purchase clear RV awning repair tape.
  • To be even better prepared, contact the dealer where you purchased your RV and ask how to purchase extra awning material that matches the pattern of your awning. Bring some of the material with you as part of your repair kit, and remember to purchase water-resistant outdoor glue for canvas.
  • Consider bringing a non-abrasive, water-based commercial fabric cleaning solution so you can remove mold, mildew, and dirt before doing any awning repairs. Some of the cleaners people like best include their favorite brand of car soaps and dish soaps (such as Dawn), as they’re made with gentle formulations.

Repairing a Large Tear or Hole

If the tear is larger than 2 to 3 feet long, or it’s a gouge or hole rather than a tear, you will need to patch the awning with matching material. This may bring to mind ugly-looking patchwork, but done correctly, this sort of repair appears almost invisible, and you can complete it yourself using these helpful steps:

Using the material you’ve purchased from the RV retailer that matches your existing awning pattern, cut out a square of material a length and width that is about 1 to 2 inches larger than the tear or hole.

Using fabric scissors or a very sharp knife, cut all hanging or loose material from the edges of the hole. You want a very clean, smooth edge to the material.

Apply the outdoor glue to the underside of your awning around the edge of the hole or tear.

Apply the new material to the underside of the hole so that the face of the material appears through the hole, and the edges land firmly in the glue you’ve just applied.

Posted in Solar Power

5 BENEFITS OF USING SOLAR POWER IN YOUR RV

5 BENEFITS OF USING SOLAR POWER IN YOUR RV

It’s an issue that’s been discussed around campsites for years now: what’s the best way to power your RV?

While most campsites do have electrical hookups available, what about those times when you’re camping away from one or you’re in a campsite where all the hookups are taken?

Now that you know the basics if you’re considering using solar power for your RV, here are the biggest benefits you’ll take away.

5. LESS NOISE

Perhaps the biggest appeal of camping is getting in touch with nature and getting away from the noise, and the growl of a generator can be pretty jarring. And with a setup that’s totally generator based, you’ll be firing it up any time you want to watch TV, cook, clean, turn on the lights, or really use your RV at all.

4. FEWER EMISSIONS

Most people who camp are at least a little environmentally minded, and using solar power is certainly better on the environment than a generator. Generators do have emissions guidelines mandated by the government, so they’re not brutally bad on the earth, but any change you can make is a good one.

Generators also bring the potentially deadly issue of carbon monoxide poisoning.

It’s not widespread, but poisoning from a generator exhaust happens. These devices have carbon monoxide detectors, but they can – and do – malfunction.

3. REDUCED COST

In terms of cost, solar power wins over a generator hands down.

After all, there’s nothing more low-cost than the sun.

Like a traditional gas-powered generator, there is some cost initially, but once you pay to install your solar system, you’re not paying for maintenance and you’re not paying for fuel again and again. There are no moving parts, which means there’s nothing to break.

A solar power system can easily last for 10 years or more.

Budgeting is a sticking point for most people, but don’t let solar scare you.

As technology has improved, the price of solar has dropped dramatically. Depending on your needs, you can actually get a small solar system installed that’s quite affordable. There are even portable solar panels these days that don’t have to be permanently installed on your vehicle.

2. LOCAL REGULATIONS

As a general rule, generator use is okay in U.S. National Parks provided it falls below a certain decibel level and is only run during certain hours. But they can actually be banned in some locations depending on the time of year.

If there’s a local fire ban or if there are protected birds roosting nearby, you may find yourself without power if you’re relying solely on a generator. If you’re using solar as your primary power source, you’ll never run afoul of local laws. Rules do vary from park to park, so it’s wise to check with your park before you go.

1. FREEDOM TO TRAVEL

Maybe the single biggest benefit of solar power is that it gives you the freedom to travel anywhere you want.

You might have to live without your air conditioner, but as long as you can do that, you’re not limited to going where you have a hookup.

For a lot of campers, you’re not really getting away until you’re boondocking. And that’s no trouble when you’re using solar power. The ability to have power no matter where you are means you can get away from the popular campsite and find secluded spots to really get in touch with nature.

SO WHAT’S THE TAKEAWAY?

RV solar system is clean, quiet, waste-free, maintenance-free, and free to operate. And you’ve got a virtually unlimited supply even on cloudy days.

Making the leap to solar power can be overwhelming and confusing, but once you make the move, you’ll be glad you did.

Especially if your RV travels are going to take you to parts unknown into areas where there’s no electricity, solar is an option you’ll definitely want to consider because it comes with nothing but benefits.

Posted in camper van, Solar Power

5 Benefits of Using Solar Power in Your Camper Van

5 Benefits of Using Solar Power in Your Camper Van

When it comes to camper vans, having electricity is critical for many reasons. Your fridge, lights, heater, and ability to charge laptops and other devices all rely upon a dependable source of electricity. Without electricity, having a camper van just isn’t all that cool!

For the most part, camper van electrical systems share one thing in common: they run off of 12-volt batteries, similar to car batteries but with the ability to complete several hundred cycles of charging and discharging. Still, different vans use different methods to charge these auxiliary batteries, which in turn power your van. That’s where solar panels come in. Camper van solar power has several major benefits when it comes to its use in camper van electrical systems.

1. Cost-free

Perhaps the greatest benefit of using solar panels on your camper van is their “fit-and-forget” nature. Once installed, solar panels require no maintenance or input to work effectively. Simply wire the panels and secure them to the roof of your van, and you will have a reliable source of power for many years to come, wherever the sun shines.

The same cannot be said for some other sources of charging, including generators. Generators not only require the purchase of gasoline to run, but they also will inevitably need some maintenance down the line. The only form of upkeep you need to undergo with your solar panels is cleaning them intermittently to ensure maximum output. This is achieved easily with the addition of a ladder to your camper van.

2. Clean Energy

One major benefit of utilizing solar power in your camper van is the sustainable nature of this power source. Unlike gasoline-powered generators and grid electricity which comes largely from coal-fired power plants, solar power is a completely clean and renewable energy.

If you are using your Sprinter van conversion like most people do, to access the beautiful outdoor spaces you love, then you probably understand the importance of relying on clean energy sources to protect our planet. The amount of electricity used by a camper van is not huge in the grand scheme of things, but every little bit counts. Plus, adding solar panels to your camper van puts money in the green energy industry, which, in turn, helps it to grow.

3. Off-Grid Capabilities

If you want to take your camper van off-grid, solar power is a must. Nothing beats the freedom of being able to camp wherever you want, regardless of whether hookups are available. Solar panels allow you to rely entirely on the sun’s rays to keep your food cold, your devices charged, and your lights on!

If you are concerned about running out of power during cloudy weather, this is rarely an issue. Solar panels are still capable of harvesting some of the sun’s energy, even in cloudy or partially shaded conditions. And, if you have enough battery storage, you should be able to last for a number of days without charging the batteries at all. Just a few hours of full sun is enough to fully charge most camper van battery banks.

4. Sleek and Space-Saving

Another great thing about solar panels is their mounting location on your van. In order to maximize sunlight exposure, you’ll want to mount your panels on the roof of your van. This frees up precious space inside of your rig that might otherwise be used by a generator. 

Most solar panels are an inch thick or less. Their low profile means that you probably won’t even be able to see them from the ground. And, given the large size of Sprinter van rooftops, you’ll still have plenty of room for gear and accessories up there.

5. Durability

You might be concerned about how long a piece of glass will last on the roof of your van. Rest assured, however, that solar panels are up to the task. The life expectancy of solar panels is 25 to 30 years. After this amount of time, they don’t stop producing electricity – but they lose enough efficiency to bring them below industry standards. It’s likely that your solar panels will outlast the Sprinter van itself.

Solar panels are not just durable, they are rugged as well. Most panels are built to withstand decades of harsh sun, wind, rain, snow, and even hail. In fact, high-quality solar panels are specifically tested to ensure that they can withstand moderate to large sized hail. As long as they are installed securely by your professional camper van outfitter, the panels will have no trouble withstanding the high wind speeds of the highway.

Posted in wheelchair van

The Benefits of Owning a Wheelchair Van

The Benefits of Owning a Wheelchair Van

For wheelchair users, mobility can be an everyday challenge. And, when it comes to completing simple tasks like picking up groceries, going to a doctor’s appointment or just going to a family member’s home, finding transportation can make these easy trips turn into a bigger ordeal.

For many wheelchair users this means arranging for a caretaker to help them transfer into a car or SUV and then driving them to their destination. This can be taxing for both the wheelchair user and their caregivers, both physically and also mentally.

And, even though a wheelchair van can provide increased mobility for wheelchair users, many may be hesitant to consider buying one of the many wheelchair vans sale. For some, this is because an accessible minivan can be costly and they don’t think they can afford it. For others, it may be because they prefer a car and don’t find driving a van as appealing or maybe they think it won’t be as fun to drive.

But, as we tell all of the customers we work with, there are many benefits to owning a wheelchair van that they may not have considered before. Take a look at these five benefits for owning a wheelchair van – you may be surprised to learn a few ways a wheelchair van could benefit you or a loved one:

Comfortability and Reduced Pain & Fatigue

Transferring a wheelchair user into a standard seat of a car can become incredibly taxing on a caregiver. It can cause shoulder, back and joint pain, and also lead to fatigue more quickly. Similarly, the requirement of transferring to a standard vehicle seat can become taxing on the wheelchair user’s body, especially their shoulders and back. For some wheelchair users, the pain can cause them to want to avoid transfers altogether and reduce their mobility even further.

Wheelchair vans eliminate the need for transfers to a standard vehicle seat. Wheelchair users can roll into the vehicle’s cabin and sit using their wheelchair in the front passenger position, a middle cabin position or even the driver’s position. For many wheelchair users, this is the most comfortable way to ride within a vehicle, by remaining in their wheelchair.

For wheelchair users with greater mobility who may want to transfer to a driver or passenger seat, a wheelchair van transfer seat, like the Rollx Vans six way transfer seat, is a great option available for many wheelchair vans. This option allows wheelchair users to position their wheelchair side-by-side with the transfer seat and transfer in a safe, comfortable way that is much easier on their body than moving to a standard vehicle seat.

Ease of Entering and Exiting the Vehicle

Wheelchair accessible minivans and full size van options make getting into and out of a vehicle incredibly simple. Once inside the van, wheelchair users can move around with their wheelchair and secure themselves in their chosen seat position with the use of a manual or electronic tie down device. Plus, the lowered floor and interior eyebrow allow for caregivers to move within the cabin of the van with ease.

Increased Safety

Vehicle safety is incredibly important for anyone out on the open road. For wheelchair users looking to stay within their wheelchair inside a vehicle, safety can be an important concern. Wheelchair van manufacturers, strive to make sure wheelchairs stay locked safely in place within the vehicle’s cabin, even in the event of an accident. They do this with the help of wheelchair securement devices and through thorough safety testing of the converted vehicle.

Saved Time

One often overlooked benefit of a wheelchair van is the amount of time the vehicle saves for the wheelchair user and their caregiver. As mentioned earlier, wheelchair vans reduce the amount of time it takes to enter and exit the vehicle by allowing the wheelchair user to remain in their chair and eliminate the need to wait for the wheelchair to be folded and stowed away by a caregiver. This alone allows wheelchair van users to get on the open road in a quicker, more efficient manner.

Greater Freedom and Independence

Above all else, wheelchair vans allow wheelchair users more independence and freedom with their mobility than any other type of vehicle. With the help of a wheelchair van, wheelchair users can go where they want to go, whenever they want to go there.

They can choose to be the driver for increased independence, or they can choose to be a passenger within the vehicle without leaving the comfort of their wheelchair. The possibilities with a wheelchair van, whether it’s a minivan or a full-size van, are endless.

Posted in ladder rack

KNOW YOUR LADDER RACK OPTIONS

KNOW YOUR LADDER RACK OPTIONS

If you want to choose the right van ladder racks for your needs, then you need to know what options you have. That means understanding the difference between the types of racks available.

Truck Bed Rack / Over Bed Racks 

Your pickup truck bed is perfect for carrying light equipment, such as your toolbox or gas cans. But, if you regularly need to carry a large cargo, then an over-bed rack is the right solution. These types of racks can add up to 1000 lbs. of cargo capacity. They mount over the truck bed in a matter of minutes, so you can easily take them down when you don’t need them.

Slide Mount Racks 

A slide mount rack is the perfect addition for transporting long equipment. If you transport ladders, pipes, or other long equipment, then this type of rack will ensure you do it safely and efficiently.

Over Cab Racks 

Over cab racks can transform your pickup truck into a double-decker, maximizing the available space and making it easy to haul bulky equipment. With over cab racks, you can add over 1200 lbs. of cargo.

Posted in COMMERCIAL SHELVING

BENEFITS OF COMMERCIAL SHELVING FOR YOUR BUSINESS

BENEFITS OF COMMERCIAL SHELVING FOR YOUR BUSINESS

Shelving may seem like a simple addition to your van, but it can make a world of difference for your business and your day-to-day tasks. Commercial van shelving is popular for many reasons, including the following benefits:

  • A well thought-out and organized workstation can improve your efficiency and productivity. By getting more done more quickly, you can thereby increase your revenue and profitability.
  • With all your tools and equipment in their designated spots, you’ll have more open space to work with.
  • An organized van looks more professional and reflects positively on your business and brand image. Each passerby is a potential customer, so you want your van to be neat and organized at all times.
  • Loose tools and equipment present risks and hazards. Storing everything properly and securely will improve safety while on the road and on the job.
  • Knowing exactly where everything is kept in your van will allow you to keep a more accurate inventory.
  • Having all your equipment and tools secured can reduce noise and damage while you drive.
  • Studies show that visible clutter can cause mental clutter. A clean and organized work space can lead to a more enjoyable and fulfilling work life.
Posted in commercial vans

7 Reasons People Love Commercial Vans

7 Reasons People Love Commercial Vans

They’re Affordable Compared to Other Vans

If budget is your primary concern, commercial vans are a great choice. Older ones are very affordable, especially compared to many other vans out there. As vanlife grows in popularity, Westies are getting more and more expensive – and that’s before you shell out thousands of dollars (or many hours of your time) getting them mechanically road ready. Newer vans like Ford Transits and Dodge Promasters are too pricey for many.

But it’s not hard to buy a nice commercial van and build it into the DIY rolling tiny home of your dreams, all for much less than buying just the base vehicle of any other van. We bought Gnomie for only $1500, and that plus new tires, taxes and registration fees, some mechanical fixes, and our entire commercial cost us just over $10,000 in total.

Low(er)-Mileage Vehicles in Good Condition are Easier to Find

A commercial van is a leisure vehicle. Most used ones you’ll find for sale were only driven once or twice a year on road trips, and those road trips likely consisted of mostly highway miles. So even though that sweet high-top van you’re looking at maybe from the mid-nineties, it’s probably in great condition with fairly low miles.

Contrast that with cargo vans. Most cargo van owners buy them for work, and only sell them after they’ve beaten them into the ground and racked up a ton of miles. While you may be able to find a newer, affordable cargo van out there, chances are it’ll be in worse condition and have much higher mileage than a comparably-priced commercial van.

Extra Headroom Makes the Interior Feel Very Spacious

The extra headroom that a high topper adds was something we honed in on pretty quickly in our van search. John didn’t think headroom would be a big deal at first, but Jayme had grown up with a commercial van and knew how awesome the extra space would be, especially for someone as tall as John. She convinced John to nix anything without a high top, and believe us, John is happy that she did!

So Many Storage Options!

Commercial vans are just plain awesome for storage. The high topper adds extra storage space that other vans just don’t have, which frees up room to create your perfect layout. Because of our high topper, we have natural shelves in the back, and in the front above the cab. .

Most commercial vans also have barn-style swing out doors that give you even more options for mounting storage, or fold out tables, or anything else you can think of, that sliding doors make impossible. This isn’t specific to commercial vans, but it’s still a great feature.

Move-In Ready (if you’re not picky)

If you just want to hit the road tomorrow, commercial vans already have factory-built interiors that are mostly move-in ready. The typical commercial van comes with a nicely-upholstered interior with basic vehicle insulation, curtains on the windows, and a rear bench seat that folds down into a bed (many are even battery-powered for push-button commercial to “bed mode”). Just throw in a cooler, a good battery isolator, some auxiliary batteries (or a Goal Zero), and you’re good to go. You can always add more amenities on the road as needed.

Awesome Base for Custom Conversions

If you’re like us and enjoy the process of turning a base vehicle into a perfectly-custom and homey living space, then a commercial van is a perfect blank slate for your van build. Once you’ve gutted it, building out a commercial van is just like building out a cargo van – except you have the added flexibility of a high topper.

Widely Available Parts and Mechanics

Older Ford, Chevy, and Dodge van models are common, and their general designs haven’t changed much in years. That means parts are easy to find, and mechanics everywhere know how to work on them – which really comes in handy when your van breaks down in the middle of nowhere.